Non-Penetrating Solar Mounting: A Technical Guide to Protecting Roof Integrity and Warranties
Ever thought of making clean energy without harming your home’s waterproof layer? Many worry that adding a support might cause leaks or lose their warranties.
A support framework holds your panels in place, on rooftops or the ground. Using a non-penetrating method keeps your building safe and your insurance intact.
Keeping your property safe is as important as the green energy it makes. This guide shows how these smart setups keep your place stable without harming your protective layers.
Table of Contents
Understanding Non-Penetrating Solar Mounting and Its Advantages
Your roof’s integrity is key, and non-penetrating solar mounting systems help keep it safe. When you look into solar panel installation, knowing the benefits of non-penetrating mounting is important.
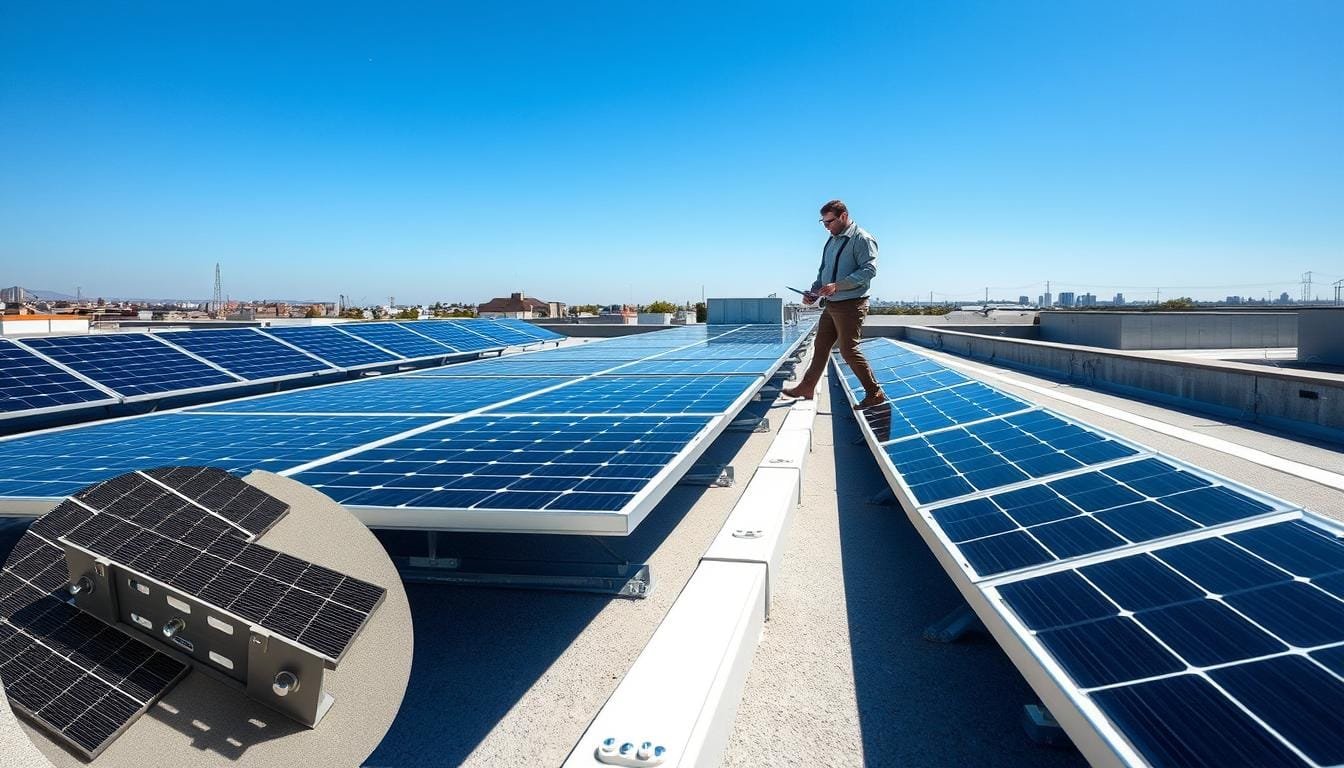
What Defines a Non-Penetrating Mounting System
A non-penetrating mounting system attaches solar panels to your roof without harming it. This is great for roofs with waterproof membranes or those that are easily damaged.
For sloped roofs, the Rail-Based Mounting System is the top choice. It’s strong and reliable, fitting many roof types and keeping panels secure.
The Critical Link Between Roof Penetrations and Water Ingress
Roof penetrations can lead to water leaks and damage over time. Non-penetrating solar mounting systems reduce this risk and protect your roof.
Key benefits of avoiding roof penetrations include:
- Reduced risk of water damage
- Preservation of roof warranties
- Minimized risk of structural compromise
How Non-Penetrating Systems Preserve Your Roof Warranty
Many roof warranties are voided if the roof is penetrated during solar panel installation. Non-penetrating mounting systems keep your warranty intact.
| Warranty Aspect | Penetrating Mounting | Non-Penetrating Mounting |
|---|---|---|
| Warranty Validity | Often Voided | Remains Valid |
| Risk of Water Ingress | Higher | Lower |
| Roof Integrity | Compromised | Preserved |
UK Building Regulations and Non-Intrusive Installations
In the UK, building rules stress the need to keep roofs intact during solar installations. Non-penetrating solar mounting systems meet these rules, making installations effective and legal.

Choosing non-penetrating solar mounting protects your roof and follows UK building standards. It’s a smart choice for many homeowners and businesses.
Evaluating Non-Penetrating Mounting Options for Your Roof Type
Different roofs need different solar mounting solutions. Non-pitched roofs, for example, require a special approach. This is because they offer a “blank canvas” but need a different engineering method.
Ballasted Solar Mounting for Flat and Low-Slope Roofs
Ballasted solar mounting is great for flat and low-slope roofs. It uses weights to keep the panels in place, avoiding roof damage. The weights sit on trays or frames that spread the load evenly.
Key benefits of ballasted solar mounting include:
- Reduced risk of roof damage
- No penetrations to compromise the roof’s integrity
- Ease of installation and removal
Standing-Seam Metal Roof Clamps and Mechanical Interlock Systems
Standing-seam metal roofs benefit from clamps and mechanical interlock systems. These systems attach to the roof seams, securing the panels without harming the roof’s watertightness.
Using standing-seam metal roof clamps has many advantages, including:
- High level of security for the solar panels
- Preservation of the roof’s warranty
- Flexibility to accommodate thermal expansion
Adhesive-Based Mounting Solutions
Adhesive-based mounting is a non-penetrating option for some roofs. It uses strong adhesives to stick the mounting brackets to the roof.
When choosing adhesive-based mounting, remember to:
- Ensure the adhesive is compatible with the roof material
- Follow the manufacturer’s installation guidelines
- Conduct thorough testing to verify the bond’s strength
Selecting the Right System for Your Roof Material
Choosing the right non-penetrating mounting system depends on your roof material. Each material has its own characteristics, affecting compatibility with different mounting solutions.
For example:
| Roof Material | Suitable Mounting System |
|---|---|
| Flat or Low-Slope | Ballasted Solar Mounting |
| Standing-Seam Metal | Clamps and Mechanical Interlock Systems |
| Specific Membranes | Adhesive-Based Mounting |
By picking the right non-penetrating mounting system, you can ensure a secure, efficient, and warranty-compliant solar installation.

Preparing Your Roof for Leak-Proof PV Installation
Before starting your non-penetrating solar mounting installation, prepare your roof for a leak-proof PV installation. A detailed site assessment is key. This includes checking the roof’s structure to ensure both your roof and solar system last long.
Step 1: Conduct a Structural Load Assessment
It’s important to check if your roof can handle the solar mounting system’s weight. Look at the roof’s material, condition, and strength. A structural engineer can help check if your roof can take the extra load.
- Evaluate the roof’s material and condition
- Assess the structural integrity of the roof
- Consult with a structural engineer if necessary
Step 2: Inspect Roof Condition and Identify Seam Locations
Checking the roof’s condition is crucial to spot any problems. Look for wear, damage, or decay. Also, find the seams and other key areas.
Step 3: Verify Warranty Terms with Your Roof Manufacturer
It’s important to check the warranty terms with your roof’s maker. This ensures the solar installation won’t damage your roof’s warranty. Read the warranty and talk to the manufacturer if you’re unsure.
- Review the warranty documentation
- Contact the manufacturer to clarify any doubts
- Ensure compliance with warranty terms
Step 4: Gather Required Tools and Mounting Components
Finally, get all the tools and parts needed for the solar installation. Make sure you have everything before you start.
- List of required tools and components
- Verify the quality and compatibility of the components
- Ensure all necessary materials are on site before installation
Installing Standing-Seam Metal Roof Clamps Without Penetration
Choosing the right clamping method is key to keeping your standing-seam metal roof in top shape. These clamps attach to the roof’s seams without making holes. This keeps the roof watertight.
Step 1: Position Clamps Along Standing Seams
Start by placing the clamps along the standing seams of your roof. You need to measure and mark carefully. This ensures the clamps are evenly spaced and aligned right.
Measuring and Marking Clamp Locations
First, figure out where your solar panels will go. Use a tape measure to mark where the clamps will be. Remember to consider the panel width and spacing.
Ensuring Proper Seam Engagement
Make sure the clamps fit well with the seams. They should sit snugly, giving a strong hold for your solar panels. S-5! clamps are great for this, as they don’t need drilling.
Step 2: Secure Clamps Using Round-Point Setscrews
After placing the clamps, secure them with round-point setscrews. Be careful with the torque to avoid damage.
Torque Specifications and Tightening Sequence
Check the manufacturer’s guide for the right torque. Use a torque wrench to tighten in a star pattern for even pressure.
Avoiding Seam Deformation
Be gentle when tightening to prevent seam deformation. Over-tightening can harm the roof’s watertightness.
Step 3: Accommodate Thermal Expansion in Your Layout
Metal roofs change with temperature, affecting solar panel placement. You need a flexible mounting system to handle this.
Calculating Expected Metal Movement
Figure out the metal’s expected movement based on your area’s temperature and panel length. This helps you plan the system’s flexibility.
Installing Floating Mid-Clamps
Use floating mid-clamps for flexibility during temperature changes. These clamps move with the roof as it expands and contracts.
Step 4: Attach Rail Systems and Mount Panels
Attach the rail systems to the clamps and mount the panels. Make sure the rails are tight and panels are aligned and secure.
By following these steps, you can install standing-seam metal roof clamps without harming your roof. This keeps the roof’s integrity and warranty intact.
Implementing Ballasted Mounting Systems Safely
For flat and low-slope roofs, a ballasted mounting system is a top choice. It’s stable and keeps the roof warranty intact. This method uses heavy weights to keep the solar array steady, without harming the roof.
Step 1: Calculate Required Ballast Weight for UK Wind Loads
The first step is to figure out how much ballast weight is needed. This depends on the roof’s location, height, and the area around it. Getting this right is key to stop the solar array from moving in strong winds.
Step 2: Position Ballast Trays and Distribute Weight Evenly
After figuring out the ballast weight, place the trays on the roof. Spread the weight evenly to avoid damaging the roof. This also keeps the solar array stable.
Step 3: Install Mounting Rails and Secure to Ballast Frames
Next, put the mounting rails on the trays and attach them to the frames. Make sure the rails are aligned right to hold the solar panels. They must be fixed well to the frames to stop the array from moving.
Step 4: Mount Solar Panels and Verify Stability
Finally, put the solar panels on the rails and check if everything is stable. Make sure all connections are tight and the array is securely held. Regular checks are needed to keep the system stable over time.
By following these steps, you can safely set up a ballasted mounting system. This keeps your roof safe and your solar array working well.
Maintaining Roof Integrity Throughout Your Solar Installation
To keep your solar installation working well, it’s key to look after your roof. You need to do a few checks and maintenance tasks. These steps help protect your roof and make sure your renewable energy solutions run smoothly.
Conducting Post-Installation Inspections
After putting up your solar panels, it’s important to check them over carefully. Look for any damage or leaks around where they’re fixed to your roof. Regular cleaning and checks are also needed to keep your system at its best.
Monitoring for Thermal Movement and Adjusting Clamps
Solar panels and their mounts can change size with temperature changes. It’s important to watch for this to avoid harming your roof or panels. By adjusting the clamps and making sure the mounts can move, you can keep your roof safe.
Scheduling Regular Maintenance Checks
Keeping up with maintenance is crucial for your solar system’s long life. Plan to check your solar panels, mounts, and roof regularly. This early action can spot and fix problems before they get worse, keeping your green energy solutions running well.
Documenting Your Installation for Warranty Compliance
It’s essential to document your solar installation properly for warranty and maintenance reasons. Keep records of the installation, including photos and reports. This will be useful for warranty claims and making sure your system meets all the rules.
Conclusion
Non-penetrating solar mounting systems are a great way to protect your roof during solar panel installation. They keep your roof safe from water damage and help keep your warranty valid.
For a successful solar panel installation, planning is key. You need to check your roof’s strength, inspect its condition, and make sure your roof warranty is still good.
Keeping your solar installation in top shape is also important. Watch for any signs of movement and adjust the clamps if needed. This helps avoid problems and keeps your solar panels working well.
By following this guide, you can enjoy the benefits of solar energy. You’ll also protect your roof and make the most of your solar panel investment.